Deploy Ktor API to AWS
Table of Contents
We will eventually need to access this API of ours at some point. Of course, there are couple of options. We can use a dedicated server or a VPS, or we can use a cloud service. The reason why I am learning backend development is not to maintain server configurations or runtime environments. That’s why I decided to move on with a cloud service. AWS to be specific.
I knew very little about AWS and its services, so I did what any experienced developer would do. I asked to ChatGPT. It gave me some roadmaps and keywords to further research. AWS AppRunner seems to be a reasonable point for me to start. It seems easy to manage and deploy a service.
AWS App Runner, lets you deploy your code or container image to it and configure few details and voila! Your service is ready and preferably reachable from the entire internet.
Despite encountering a few obstacles that took several hours to resolve during the deployment process, I’ll explain those issues shortly.
Let’s start, If you are following along, first step is to create an AWS account.
Create an IAM user #
IAM is Identity and Access Management service of AWS. Accessing and managing resources with root account is not ideal nor recommended. So, we will create a user. We will later use access credentials of this user to manage some AWS resources.
Creating a user might require you to create a user group.
What is ECR #
ECR is AWS Elastic Container Registry. We can deploy docker images and use those images in different services such as ECS or AppRunner. In previous posts I dockerized the project. I will use that image to deploy it to ECR, then use that image in AppRunner.
Before all of that we need to give some permissions to this user to do all that.
Give the user some permissions #
Go to User’s page on AWS console. Click Add Permissions. In the opened page you can select permission options to add the permissions to the user group or attach directly. I selected “attach directly”. Add “AmazonEC2ContainerRegistryFullAccess” permission. After adding that, we need another permission. Click “Add Permissions” again, and this time select “Create inline Policy”. Switch to Json Tab and paste this policy. Then save it.
{
	"Version": "2012-10-17",
	"Statement": [
		{
			"Effect": "Allow",
			"Action": [
				"ec2:Describe*",
				"iam:ListRoles",
				"sts:AssumeRole"
			],
			"Resource": "*"
		}
	]
}
First permission is pretty self explanatory.
Second permission is required for this user to execute necessary AWS commands.
Create a repository in ECR #
Go to ECR page on AWS and create a repository. We will later need those information to deploy our image. It has a aws url, you need to specify namespace/repo-name . I created my repository as ktor/sample-api. Configure general settings, I selected Immutable on Image Tag Mutability. Then click create!
Go to ECR repository’s page and select Images on the menu. You can see the commands to push images to this repository if you click “View Push Commands” button. We will use those commands in our GitHub action in a bit.
GitHub action to deploy docker image to ECR #
I host my project on GitHub, and what I need is to automate the process to push latest image to ECR. So, again, I asked ChatGPT to create a GitHub action. It did quite well, I must admit.
name: Deploy to AWS ECR

on:
  push:
    branches:
      - main  # Trigger on push to main branch

jobs:
  build-and-deploy:
    runs-on: ubuntu-latest

    steps:
      # Checkout code
      - name: Checkout code
        uses: actions/checkout@v4

      # Configure AWS credentials
      - name: Configure AWS credentials
        uses: aws-actions/configure-aws-credentials@v3
        with:
          aws-access-key-id: ${{ secrets.AWS_ACCESS_KEY_ID }}
          aws-secret-access-key: ${{ secrets.AWS_SECRET_ACCESS_KEY }}
          aws-region: eu-central-1

      # Login to Amazon ECR
      - name: Login to Amazon ECR
        uses: aws-actions/amazon-ecr-login@v2

      # Build, tag, and push image to Amazon ECR
      - name: Build, tag, and push image to Amazon ECR
        env:
          ECR_REPOSITORY: ktor/sample-api
          IMAGE_TAG: latest
        run: |
          docker build -t $ECR_REPOSITORY:$IMAGE_TAG .
          docker tag $ECR_REPOSITORY:$IMAGE_TAG ${{ secrets.AWS_ACCOUNT_ID }}.dkr.ecr.eu-central-1.amazonaws.com/$ECR_REPOSITORY:$IMAGE_TAG
          docker push ${{ secrets.AWS_ACCOUNT_ID }}.dkr.ecr.eu-central-1.amazonaws.com/$ECR_REPOSITORY:$IMAGE_TAG
GitHub uses secrets, this way sensitive data is protected.
Go to settings of the project and add these secrets.
AWS_ACCESS_KEY_ID : this is the user’s access key id
AWS_SECRET_ACCESS_KEY: this is the user’s secress access key
AWS_ACCOUNT_ID: this is our account id, you can find this id in the menu if you click your name in AWS console, on right top.
We need to create access key for the first two. Go to the user’s page in AWS console. In the summary section, click the “Create Access Key” button. In the creation page, select CLI as use case. Then click “Create Key”. It will give you the values above. Download as CSV, because you will not be able to see the secret value after closing this page.
Use those values to add GitHub secrets in the project.
Note: I selected eu-central-1 as aws region of this repository. Change the values if you created your repository in another region.
We completed most of it. If the project builds successfully, this script will deploy latest state of the project as docker image the our ECR repository.
Create App Runner project using the image in ECR #
https://youtu.be/TKirecwhJ2c?si=3m_opvjuOUgExX6m
This video is great to understand what App Runner does and how to set it up.
I will simplify the steps you need to follow. You can watch the video for detailed explanations.
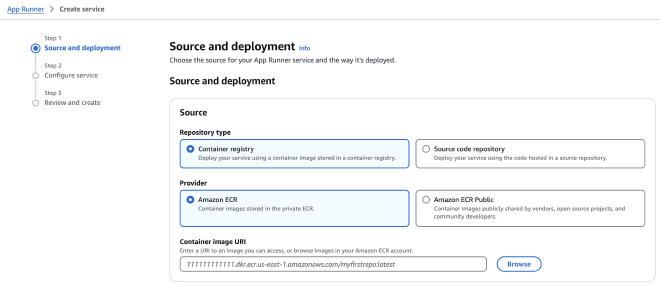
Go to AWS App Runner page, then click “create service”.
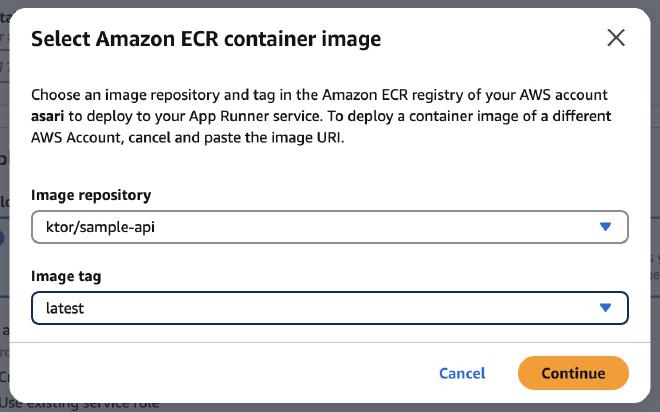
In “source” section select “Container Registry” as repository type and “Amazon ECR” as provider. To provide our container image, click Browse

Select your image and hit contiue.

As Deployment Settings I selected manual. But I think selecting Automatic(1$ additional fee) will be a good idea in next projects.
Create a new service role and give it a name. Then click next.
In Step 2 you will configure your service.
Important part of this section Port settings. You need to specify the port you exposed in the docker image and your api.
Complete your configurations and click next. In the last page review your settings and create the service. It will take a couple of minutes for your service to deploy.
Once the deployment is completed, you can reach the service through the url in default domain presented. If you want to reach from your domain you can configure it from custom domains tab.
This is it! We deployed the image to ECR, used that container image in App Runner and deployed our service. Now it is accessible from the whole internet 🎉
Some obstacles(of mine) #
You can skip this section if you aren’t interested in my misery.
Setup process was not straight forward for me at the first time.
Before I created the GitHub action yaml, I tried to deploy a docker image to ECR manually. Jokes on me, I thought it would be easier.
I tried follow the commands in ECR repository page. First error was about the user. I created the user I mentioned. Then I got the permission error, so I gave necessary permissions. Finally I was able to push an image to ECR 🥳
But the server did not run. After some extensive research, I found that docker image platform is different. I use MacOS machine which produce linux/arm64 based images. But the App Runner needs linux/amd64 image. I’ve tried building multi-platform images from my local docker. Then I had some container issues, it was not be able to create multi-platform images.
Then I realized this is taking too long. GitHub actions runs on amd64 images if you use ubuntu runners. So, this will solve my issue. Then I asked ChatGPT and it gave me nearly perfect script. Changed couple of variables, added some secrets and it is done.
I’ve learned valuable information in this process.
This process was very informative.
While it had its challenging moments (especially those platform compatibility issues!), I’m really happy with how everything turned out. Getting hands-on experience with these tools has been super exciting!
I love how Docker, GitHub Actions, and AWS work together like a well-oiled machine. Sure, the setup was a bit tricky at first, but once everything clicked into place.
Can’t wait to dive deeper into AWS and explore more cool features. Maybe next time I’ll try that automatic deployment option - sounds like it could save me some headaches! 😄